A dryer duct, often called an exhaust duct, is an essential component of a dryer system that helps to vent out hot air and moisture during the drying cycle. They are usually made of, aluminum, galvanized steel, or plastic and are commonly located behind or alongside the dryer unit.
Over time, these ducts can accumulate dirt, lint, and debris, restricting airflow and reducing the dryer’s efficiency. Additionally, moisture in the air can mix with the lint, creating a paste-like substance that sticks to the duct walls, which can further impede airflow and promote mold growth.
Cleaning a dryer duct is relatively easy, as you simply need to unplug the dryer, disconnect the duct, use a vacuum cleaner, deep clean it, and reconnect it. In this article, we will provide a step-by-step guide on how you can do this effectively. Additionally, we will also talk about the importance of regular maintenance and highlight why you should do this regularly.
Signs That Your Dryer Duct Needs Deep Cleaning
There are a few tell-tale signs that indicate you have a clogged or dirty dryer duct that needs cleaning. These signs typically include lint buildup, burning smells, and longer drying cycles.

It’s important to pay close attention to any of these signs, as they can not only damage your dryer but also pose health risks.
- Your Clothes Take Longer to Dry: If you’ve noticed that your clothes are taking longer to dry than usual, it may be a sign that your dryer duct needs a deep cleaning. Over time, lint and debris can accumulate in the duct, obstructing the airflow and causing your dryer to work less efficiently.
- There’s Lint Buildup Outside the Dryer Hose: Another sign to look out for is lint buildup outside the dryer hose. If you notice excessive lint on the hose’s exterior or around the vent opening, it clearly indicates a buildup inside the dryer duct.
- You Notice a Burning Smell: Lastly, if you detect a burning smell coming from your dryer, it could be due to lint or other debris getting trapped in the duct and overheating. If this is the case, unplug your dryer and clean it to prevent fire hazards.
1. Unplug the Dryer and Disconnect the Dryer Duct
Before you start the cleaning process, you will need to let your dryer cool down, especially if you’ve recently used it. Doing this not only ensures safety but also allows for more effective cleaning.
Once the dryer has cooled down, unplug it from its electrical socket and move the dryer away from the wall to access the dryer duct and create enough space for thorough cleaning. You should also unscrew the hose, remove it from the built-in duct opening, and disconnect it from the dryer duct.
2. Vacuum the Dryer Duct
Next, vacuum any easily accessible space, usually the opening of the dryer duct. This is important especially if it hasn’t been cleaned for a long time. By using the brush nozzle attachment on your vacuum cleaner, you can efficiently remove any lint or debris that may have accumulated in the opening of the dryer duct. This method helps prevent lint from spreading throughout your laundry area during deep cleaning.
3. Select a Suitable Tool
Before moving on to the deep cleaning process, select an appropriate tool that will effectively dislodge lint build-up from within the dryer duct. As the buildup can vary in severity, we’ve compiled a list of popular options below to cater to different needs.
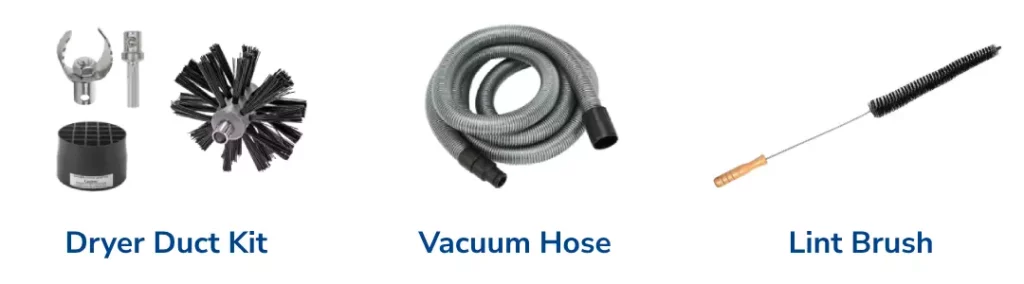
Using a Dryer Duct Cleaning Kit
Investing in a dryer duct cleaning kit is the most convenient option, if you haven’t cleaned your dryer duct for an extended period or have never done it before. One highly recommended option that you can consider is the Sealegend 10-Piece Dryer Vent Cleaner Kit.
This comprehensive kit is easy to use, thoroughly cleans your dryer duct, and can be reused for your next cleaning session. To use a dryer duct cleaning kit, simply attach the brush head to the flexible rods and insert them into the vent opening.
Then, place your vacuum head over the dedicated hole and turn it on while gently maneuvering the rods back and forth. This easily removes lint and dirt from the walls of the dryer duct into the vacuum, efficiently cleaning it without making a mess.
Using a Vacuum Hose
When it comes to cleaning your dryer duct, a vacuum hose can also be a handy tool. Not only does it help in removing lint buildup, but it also helps in dislodging stubborn lint that may be sticking to the walls.
To use a vacuum hose effectively, simply feed it into the dryer duct and let it suck up any accumulated lint. Using the brush attachment can further help loosen any heavy dust and make the cleaning process even more thorough for those hard-to-reach areas.
Using a Lint Brush
In addition to the previous methods, a lint brush on a long stick is another effective way to clean your dryer duct. This tool lets you reach deep into the duct and remove any trapped lint or debris. It is especially useful for newer dryer ducts that are less clogged.
To use this method, simply attach the lint brush to the long stick and carefully insert it into the duct, rotating it as you move along. Make sure to cover the entire length of the duct to ensure it is cleaned properly.
4. Deep Clean the Dryer Duct
Once you have selected the appropriate tool for the job (you may also select a combination of the ones we mentioned above), it is time to begin the deep cleaning process. This process consists of cleaning three distinct sections, each requiring careful attention and thorough cleaning techniques. Let’s delve into these sections below.
Inside & Outside the Built-In Duct
The first section to clean is typically located inside your home. This is where the duct starts, leading to the outside of your house. This is essentially the endpoint of the dryer duct and requires thorough cleaning.
To effectively clean the duct, it’s important to reach the end, which is usually located on the side of your house or roof. If the duct is positioned at the side of your house, it’s also recommended to go outside and clean the outer part. However, if it’s located on your roof and not easily accessible, you can skip this step.
Flexible Hose
Next, you’ll want to clean the flexible hose to ensure that it’s unobstructed. The flexible hose of the duct is typically constructed from aluminum and links the dryer’s interior duct to the built-in home duct. However, due to its delicate nature, handling this hose carefully is extremely important to avoid damaging it.
To clean the flexible hose effectively, make sure it’s fully disconnected on both ends. Then, use a soft brush or vacuum cleaner to remove any lint or debris accumulated inside. Be cautious not to apply too much pressure, as this can cause tears or holes in the hose.
If you notice any visible damage or if it appears worn down, it is advisable to replace it instead. This will ensure optimal performance and minimize potential hazards associated with a damaged hose.
Dryer’s Interior Duct
The interior duct refers to the built-in duct inside your dryer. Its purpose is to circulate air and effectively remove moisture from your clothes. Neglecting this essential maintenance task can lead to reduced efficiency, prolonged drying times, and even potential fire hazards.
Cleaning the interior duct involves removing any accumulated lint or debris that may have built up over time. You can do this by accessing the duct through the back panel and using a vacuum or brush to clean out any lint and other residue carefully.
5. Reattach the Dryer Duct and Plug in the Dryer
Once you have thoroughly cleaned all the sections of your dryer and removed any remaining residue, it is time to reattach the dryer duct. Begin by carefully screwing in the hose securely to ensure a tight connection.
Then, double-check that all clamps are properly fastened to prevent any air leaks. Once the dryer duct is securely attached, carefully move your dryer back to its original position, ensuring enough space for proper airflow. Finally, plug in the dryer and test it to ensure it works properly.
Benefits of a Clean Dryer Duct
Having a clean dryer duct goes beyond just ensuring your clothes are dried entirely. Below, we will explore the advantages of keeping your dryer duct clean and how it can improve efficiency and safety.
- Dries Your Clothes Faster: When your dryer duct is clear of any obstructions or buildup, your clothes will dry much more quickly. This means you won’t have to run multiple drying cycles as your dryer will run more efficiently, saving you time.
- Saves Energy: A clean dryer duct can also save energy. When the airflow is unrestricted, the dryer doesn’t have to work as hard to push out the moist air from your laundry. This not only reduces energy consumption but also helps prolong the lifespan of your dryer.
- Increases Your Dryer’s Lifespan: When lint and debris accumulate in the duct, it puts unnecessary strain on the motor and other components of the dryer. By keeping it clean, you can prevent costly repairs or prematurely replacing it, significantly extending its lifespan.
- Reduces Risk of Fire: Lastly, cleaning your dryer duct regularly also reduces unnecessary fire risks. Lint is highly flammable, and if it accumulates in the duct, it can easily catch fire when exposed to high temperatures. Regular cleaning and maintenance eliminates this hazard and provides peace of mind, knowing your home is safer.
Ways to Maintain Your Dryer Duct
Maintaining your dryer duct ensures longevity and safe functioning. Below, you’ll find four easy ways that ensure your dryer duct is clean, and performing optimally.
- Clean the Lint Filter Before Every Cycle: Lint accumulation in the dryer duct can lead to reduced airflow and potential fire hazards. Regularly cleaning the lint filter before every cycle prevents this and improves drying efficiency, extending your dryer’s lifespan.
- Deep Clean the Dryer Duct Annually: Over time, lint and debris can build up in the duct, causing blockages that hinder proper airflow. Therefore, it’s best to deep clean your dryer duct once every year. Larger families who use their dryers frequently should do this twice a year instead.
- Vacuum Areas Around the Dryer Regularly: Dust and lint tend to accumulate around the dryer, especially in corners and vents. Keeping these areas clean will prevent any potential obstructions so it’s important to vacuum every two weeks.
- Ensure the Dryer Is Placed in a Well-Ventilated Room: Good ventilation is crucial for expelling hot air and moisture generated during drying cycles. Even though the duct is responsible for expelling heat away from the dryer, the main unit still generates heat. A poorly ventilated room can trap excess heat and humidity, leading to issues such as mold growth or damage to surrounding surfaces. Thus, make sure your dryer room is always ventilated well.

About Sirinan
Sirinan is a self-proclaimed cleanaholic and the editor-in-chief of Cleaney. Apart from coming with up creative ways to keep her living spaces clean and tidy, she loves to read on rainy days.